WELL....WE HAS FACE A NEW OS FROM MICROSOFT....BUT SADLY THEY HAS REMOVE 1 OF UNIQUE FEATURES IN VISTA ULTIMATE - WINDOWS DREAMSCENE...BUT DONT WORRY....THERE IS STILL GOT A SOLUTIONS FOR IT...
Dreamscene was a feature introduced in Windows Vista that allowed users to have video wallpapers in the background. Microsoft seems to have replaced the Dreamscene feature from Vista with automatic changing wallpapers in Windows 7. However by adding the Dreamscene files and making a few registry changes, Dreamscene can once again be enabled. Don’t worry if that sounded intimidating, we do have a file that does all for you [if you're on 32-bit.]
Note: I was unsuccessful in getting this to work on 64-bit Windows 7 Build 7048.
Installing Dreamscene:
1) First, you need to have Aero enabled. You’ll know Aero is enabled if you’re able to preview windows in your taskbar, use Aero Peek, or see the animation effects of windows minimizing. If you think Aero isn’t enabled, open the Start menu, and type in Aero.
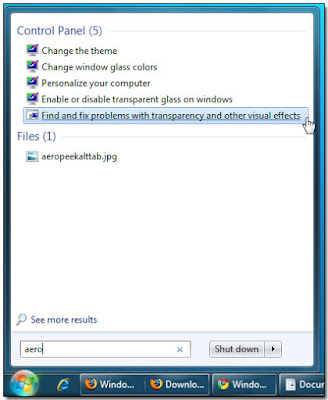
Click on Find and fix problems with transparency and other visual effects and go through the wizard. The wizard will determine whether your computer is capable of having Aero on.
2) If you’re on 32-bit Windows 7, download the Windows 7 Dreamscene patch here
If you’re on 64-bit Windows 7, download this patch and follow the instructions in Important Readme.txtThen skip Step 3.
3) Run the patch and let it do it’s thing. When it’s finished, explorer.exe will restart.If it doesn’t restart, press Ctrl +
Alt + Delete and click on Task Manager. Right click on explorer.exe and click on End Task. Then click on File, New Task, type in explorer.exe and press OK.
WARNING:
There is still a bug for this force Windows Dreamscene software to run in Windows 7,the problem is the ICON Text might become blur OR Invincible after activate this Dreamscene content.
Setting video clips as your desktop background
4) Before you start adding videos, you need to make sure that your videos are in .wmv or .mpg format. If they are not one of those formats, you can download a free video converter here.
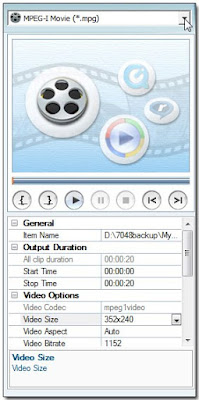
Converting a video is simple. Choose Add Video at the top left corner and choose your video of choice. The drop down-menu in the right side-bar will allow you to choose your codec. On my computer, .wmv videos worked properly while .mpg videos would not work with Dreamscene.
The bottom portion of the sidebar will allow you to change the video size or bitrate. If you are not sure what those options do, the only one you should worry about is video size since some videos may end up being too large and get cut off the screen.
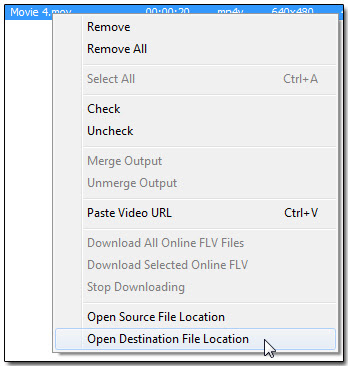
When the video is finished converting, a new window will pop up. Right click your video and choose Open Destination File Location to locate the video. You can also access your converted videos at this directory:C:\users\%username%\Documents\Any Video Converter\
Once you have converted the file, just right-click and select Set as Desktop Background and Dreamscene will begin to work.
Should you want to revert back to a stationery wallpaper, sometimes the stopped video will stay frozen as your wallpaper. To fix this, press Ctrl + Alt + Delete and click on Task Manager. Right click on explorer.exe and click on End Task. Then click on File, New Task, type in explorer.exe and press OK.
Note: Desktop icon text will become transparent sometimes. This is a bug that has yet to be fixed.
Dreamscene was a feature introduced in Windows Vista that allowed users to have video wallpapers in the background. Microsoft seems to have replaced the Dreamscene feature from Vista with automatic changing wallpapers in Windows 7. However by adding the Dreamscene files and making a few registry changes, Dreamscene can once again be enabled. Don’t worry if that sounded intimidating, we do have a file that does all for you [if you're on 32-bit.]
Note: I was unsuccessful in getting this to work on 64-bit Windows 7 Build 7048.
Installing Dreamscene:
1) First, you need to have Aero enabled. You’ll know Aero is enabled if you’re able to preview windows in your taskbar, use Aero Peek, or see the animation effects of windows minimizing. If you think Aero isn’t enabled, open the Start menu, and type in Aero.
Click on Find and fix problems with transparency and other visual effects and go through the wizard. The wizard will determine whether your computer is capable of having Aero on.
2) If you’re on 32-bit Windows 7, download the Windows 7 Dreamscene patch here
If you’re on 64-bit Windows 7, download this patch and follow the instructions in Important Readme.txtThen skip Step 3.
3) Run the patch and let it do it’s thing. When it’s finished, explorer.exe will restart.If it doesn’t restart, press Ctrl +
Alt + Delete and click on Task Manager. Right click on explorer.exe and click on End Task. Then click on File, New Task, type in explorer.exe and press OK.
WARNING:
There is still a bug for this force Windows Dreamscene software to run in Windows 7,the problem is the ICON Text might become blur OR Invincible after activate this Dreamscene content.
Setting video clips as your desktop background
4) Before you start adding videos, you need to make sure that your videos are in .wmv or .mpg format. If they are not one of those formats, you can download a free video converter here.
Converting a video is simple. Choose Add Video at the top left corner and choose your video of choice. The drop down-menu in the right side-bar will allow you to choose your codec. On my computer, .wmv videos worked properly while .mpg videos would not work with Dreamscene.
The bottom portion of the sidebar will allow you to change the video size or bitrate. If you are not sure what those options do, the only one you should worry about is video size since some videos may end up being too large and get cut off the screen.
When the video is finished converting, a new window will pop up. Right click your video and choose Open Destination File Location to locate the video. You can also access your converted videos at this directory:C:\users\%username%\Documents\Any Video Converter\
Once you have converted the file, just right-click and select Set as Desktop Background and Dreamscene will begin to work.
Should you want to revert back to a stationery wallpaper, sometimes the stopped video will stay frozen as your wallpaper. To fix this, press Ctrl + Alt + Delete and click on Task Manager. Right click on explorer.exe and click on End Task. Then click on File, New Task, type in explorer.exe and press OK.
Note: Desktop icon text will become transparent sometimes. This is a bug that has yet to be fixed.